Showing posts with label technique. Show all posts

Wednesday, June 2, 2021

Making (CitraSolv) Art Again

 It is a beautiful, sunny and hot day in Chicagoland, so I decide to get outside and work on a project I tried once before. I headed out to the deck, and gathered 3 simple items: National Geographic magazines, a foam brush and a bottle of Citra Solv. 


You can read the original blog post for a more detailed description, but here is a simple explanation. You can literally pour the Citra Solv directly on the pages, but I prefer to try to slather it on liberally and brush over it to soak each page.


The pages that don't have enough of the Citra Solv will not change much. If you soak it, sometimes the pages will become a blank gunky mess, as it actually removes all the color from the magazine. National Geographic magazines use a thick paper and quality ink. If you try this technique with any other magazine, you will like just end up with a inky mess on your hands!

It is so warm outside that the images dried rather quickly. Perhaps too quickly, since some didn't change much. Here is a good example of a finish, dried page-


I usually let them dry overnight, then tear out all the pages that turned out well, and then set them on paper towels for at least a week. This helps soak up some of the natural oils, and dissipate the orange smell. I did learn accidentally that the Citra Solv doesn't stain cotton pants! (Thankfully)

When I figure out what I am going to do with this new batch of papers, I will show you, but if you would like to see some possibilities, here a a couple:

My junk journal made with Citra Solv pages

Citra Solv also has an artist page to browse

What kinds of art projects do you complete outdoors?

Until Next Time

~Shari


P.S. After a couple days, I decided that many of the pages didn't turn out as nice as the one pictured above. I discovered (mostly due to laziness) that my spray bottle nozzle, fit perfectly on the Citra Solv bottle and made it SO easy to spray another round of solvent on the pages that needed more! Easy Peasy!


Tuesday, December 10, 2019

Trying Something New for Christmas!

Hello everyone! I have had a rough spell lately with pain, medical treatments, and trips to Mayo, and haven't been blogging much here mostly because I wasn't creating much. I buckled down after Thanksgiving and got to work on Christmas cards. Last year I made over 120 cards, but scaled it back a little this year and only made about 65. I just finish making them, writing out addresses, and slapping stamps on them, so they will go in the mail tomorrow! (later than normal)

I like variety, so I make about 5-10 of each design, based on how much paper I have that matches.

For starters, I tried the marbled shaving cream technique that I have seen everywhere lately. It was messy! The other thing I noticed, is that it probably isn't a good idea to use menthol scented shaving cream, because they cards definitely smell like shaving cream haha I wasn't thrilled with the results, and don't think it looks like the other examples I have seen. I might try it again and see if I can get a different result. Here they are-
The backgrounds drying


The finished cards

Here are the other cards I made this year:

Trying out some new dies

Added some vellum over the top because my adhesive was very sticky!

New background stamp with one of my favorite color combos- blue & silver

Another intricate die cut, that I had trouble with the adhesive. I really need to find a good way to stick these on after cutting them!

New Authentique Paper with fun colors!

Non-traditional Christmas colors

Some quilting fabric leftovers from a friend that I cut and sewed on the burlap


That's all for today! Hope to get back into the swing of things and keep creating. It is time to stock up on some birthday cards too. I have been wanting to try some more new techniques, so hopefully I can share those with you as I learn.

~Until Next Time
Shari


Tuesday, April 30, 2019

Doing It The Hard Way

It is no secret in my house that I can be very stubborn. My whole life has been spent doing things the hard way, when I could have easily chosen an easier path. Today's mini album project is no exception!


I got the idea of doing a mini album with toilet paper rolls on Pinterest last year. I pinned the idea away, saved some toilet paper rolls, and forgot about it (like most of my Pinterest projects haha). I recently saw a different person share another toilet paper album, and went back to the tutorials I had pinned. This is the beginning of where my problems started.

I had several pins with different designs that I liked. I started the mental planning phase by picking bits and pieces that I liked, and began thinking about how I could fit them together. (note to self, not all ideas work together)

I looked at a lot of photos, and read a couple words (there were SO many words). Here is where I messed up. I thought to myself "I will just figure it out as I go" and I dug in. Well, I got one thing right! I did figure it out as I went, but not until I messed up several steps, and had to undo things.....a couple times!

In the end, I ended up with two mini albums, since I liked both the hole-punched version and the accordion fold binding version, and found out those two items don't really mix, at least not with the small, stiff toilet paper rolls. I managed to get a couple cute projects, but honestly, beside looking cute, they don't seem very useful to me. They are super small, and I am not sure that I would really use them for anything.

Thankfully, I made them with a cereal box, cardboard, some old scrapbooking paper and of course, toilet paper rolls, so it was a cheap, fun, recycling project that taught me a lot. I may have learned some lessons the hard way, but I guarantee they will not soon be forgotten! Take my advice though, save yourself some trouble, and just read the instructions on the tutorial blogs! 😂

Since they turned out ok, I decided to go ahead and share them here for the Mini Album Makers Blog challenge. You can check out the Mini Album Makers Blog Challenge here


So, here are the pics you've been waiting for!
Here is when I got the first album all glued together, AND hole punched before realizing that I glued them wrong! The pages didn't open further than this. Also, I realized a hole punched paper tube, can't really be glue-bound too. So, I disassembled it all, and started over.


Second time is a charm, as I left spacing and glued the folded binding inside the tube, not on both outsides like the first time.
Here it is assembled with the cereal box cover.
Looks more like an album, AND the pages open now haha

Now I have to remove the black paper and cover all the holes I punched.

Final albums: one with glued accordion-fold binding, and one hole-punched ribbon-tied.

Here is a glimpse at a few of the pages inside the two albums.


I added some pull out sections, pages, envelopes, and tags.

Each toilet paper tube has a pull out tag.


Well, that's a wrap! Hope you enjoyed seeing these, and hopefully you are smarter than me, and can learn from someone else's mistakes! Trust me, don't be stubborn and do things the hard way. 

Any ideas what to do with these? Tempted to scrap them, and try a bigger "mini" album. 

What are you work on this week?

Until Next Time~
Shari

Monday, November 6, 2017

"stART With A Photo" ART Challenge #5

Hello again! Welcome to our Monday "stART With A Photo" challenge #5. I am still plugging along, even though no one else has played along yet! I will not be deterred! haha

So, if you are still reading, why not consider stARTing your week with an art challenge?

This week's inspiration comes from a greeting card a friend sent me. I thought the little girl pictured on the front was pretty, and I have a thing for wells. Is that weird? Anyways-


I was inspired by the colors this week, but also since I haven't felt well lately, I used my Sizzix Framelits Flip-Its die, to create a couple get well cards.


I have been making a lot of cards lately, but remember you can do any project!

Enjoy yourself. Be creative. Share your link in the comments. Please visit some of the other participant's blogs and leave them some love too!

Thanks for playing along!


Until Next Time-
~Shari


Wednesday, November 1, 2017

Messy Christmas To You!

Hello! I am just completing the last few cards out of the 80 I made for Christmas this year. I decided to try something new. I have been waiting to buy and use some gilding flakes for the past couple of years, so I went ahead and ordered two colors of flakes and some glue. Also, I am entering another challenge, so if you want to see that entry, it is the last card at the bottom of this post!

First, let me say, that gilding flakes make very pretty backgrounds, accents, etc. BUT they are so MESSY! I mean really messy, like in a tarred and feathered kind of way! This process might just be worse than the dreaded craft herpes....GLITTER! LOL

Seriously though, I advise following all the advice on YouTube and Pinterest from more seasoned professionals than myself, but here are a few tips I learned:

1st- Be sure your work space is large and clear.

2nd- Make sure there is no breeze, fan or movement of air. In fact, it might be a good idea to hold your breath once you open the jar of gilding flakes!

3rd- Don't use your finger to rub off the excess. (Just trust me on this)

4th- Foam brushes work great for applying the glue and for rubbing over the gilding flakes. They are great for lots of crafty projects, and cheap too!

5th- Just know that there will be a mess of poofy, light flakes, and possibly some glue all over your work space, and the floor. 

6th- On my first card, I put glue on a stamp, and then stamped that on the paper. In an effort to preserve glue, I applied a thin layer on the stamp and stamped the image....and then the stamp stuck to the paper....and then there was a lot of frantic activity to save the stamp, which in turn spread the flakes all over because of the whirlwind of my movements. Good news, it cleans off nicely with soapy water!

7th- When using the glue with a stamp, be sure to apply a THICK layer of glue to the stamp to avoid the mishap above. Also, keep the lid on the jar until you are actually ready to add them to the paper with the dried glue!

All things considered, I like the way they turned out, and will do it again, mostly because I still have a lot of gilding flakes and glue left. Hopefully, I will get better with practice!


This first one is the one withe the distressed stamped background and "Mulled Wine" flakes.


Then I tried used the "Aurora Lights" flakes to make these two cards-


The first one with the sentiment die-


This last one is my entry into the Mixed Media Monthly Challenge # 42


It is using the die cut "silhouette" from the first card, and the gilding flakes added to the background.


Until Next Time-
~Shari


Monday, October 30, 2017

"stART With A Photo" ART Challenge #4

Hello! If you are like me, you probably aren't a huge fan of Mondays! However, if you play along with us every Monday, you can stART your week with a challenge. Art makes everything better, even Mondays!

stART with a Photo Challenge #4


This picture was taken by me while our family was serving at a camp for families with disabilities. We were all praying and holding hands. It reminds me of the love of friends. So, I have this special birthday card as my project for this week's challenge.


Enjoy yourself. Be creative. Share your link in the comments. Please visit some of the other participant's blogs and leave them some love too!

Thanks for playing along!

Until Next Time-
~Shari


Tuesday, October 24, 2017

Impatient Alcohol Background

Alright, I admit it. I am impatient. So, when I saw the new Mix-Ability Challenge at Splitcoast Stampers, I wanted to try the alcohol background technique right away. The trouble is, I don't own any alcohol inks, so I made up a different way to do it.

I poured a little rubbing alcohol in a shallow styrofoam tray.

Then dripped in some Distress Inks. They sank straight to the bottom of the tray. Hmmmm


Doing this technique the right way, keep the alcohol ink on top of the water in the dish. You lay the paper on top and pick up the ink. Since that wasn't going to work, I dipped the paper in and pressed down to get it to the ink on the bottom. I smooshed it a few seconds and brought it up. I used one sheet of water color paper (the larger piece). I used a few scraps of white cardstock too, before the alcohol go "muddy" from the ink.


Here are the two cards I made once the paper dried-


Until Next Time
~Shari

Monday, October 23, 2017

"stART With A Photo" ART Challenge #3

Hello! Welcome to our weekly art challenge. Hope you had a restful weekend and are ready to get back in your craft room and make something!

Every Monday, you can stop by the blog for a little creative prompt, so you can stART your week with a challenge.

So, without further ado, here is this week's-

stART with a Photo Challenge #3

This week's challenge is inspired by the remaining blooms in my garden. You may have guessed by now, that purple is my favorite color, so these caught my eye. I hope this inspires you to create!


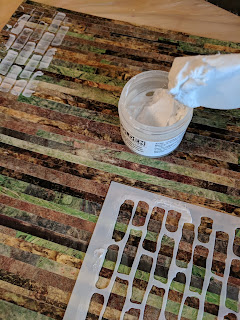
This week I was inspired to try something new. I have never made a collage before, and I had some Citra-Solv papers that I made a while ago.


To make these, you just need an old Nat Geo magazine, gloves, a brush, and Citra-Solv.  Apply it liberally, close the magazine and leave it for a while to soak. Then lay the pages out and let them finish drying. More details are available on their website. This was the first time I tried it and got some great results, but the pages have been laying on a shelf for a long time waiting to be used. 

I decided to try a collage this week. I have never done one before, and thought it could be fun, which is the #1 rule for this challenge, so I knew I was on to something!

I cut the pages into various size strips, and glued them down with the Mod Podge.


This dried very fast with the window opened. I used coarse paste with a rubber spatula and brick stencil to add texture.


I let the paste dry for a few minutes, and then sprayed it with the Glimmer Mist, and set the whole thing aside.


Next, I tore some pieces of the Citra-Solv papers to make flowers and stems, and glued them to scrap paper for a firm backing.


I glued those to the background, and set it in front of the window again to dry. I grabbed my floral wire, and of course, made a flower with it! I used some new sheets of my Citra-Solv papers to make a background for the wire flower.


I used the tacky glue to attach the wire flower to the chipboard, and held it down with books for several hours to let it thoroughly dry. I used the sharpies to "doodle" an outline around all the flowers to give them some definition. I used the hot glue gun to make dots in the center of the flowers, because I wanted to see how it would look, and this was a fun project with lots of new techniques to try, so why not? Lastly, I glued some torn book pages to the top of the collage and finished it off with the reminder to "Bloom where He has planted you." Some times it is easy for me to feel isolated and think that I have nothing to offer. I need to remember that even if I can't do the things I used to, I can still be useful right where God has planted me. Sometimes that looks much different than I would have hoped for, or chosen, but it is right where I need to BLOOM and grow.

Here is my finished project for this week's challenge-


Enjoy yourself. Be creative. Share your link in the comments. Please visit some of the other participant's blogs and leave them some love too!

Thanks for playing along!

Until Next Time-
~Shari